手工川精讲吴恩达 Claude Code 教程 04:Prompt 范式、深度思考、上下文工程与 MCP
- 作者:手工川(南川同学)
- 创建于 2025年8月18日,最后更新于 2025年8月18日
- 分类:AI 工具
- 标签:Claude Code转载AI
- 所属系列:吴恩达 Claude Code 笔记
- 转载自微信公众号「手工川」· 第 4 期

转载声明:本文系转载自微信公众号「手工川」的《吴恩达 Claude Code 笔记》第 4 期。原文版权归作者与公众号所有;正文整理自 DeepLearning.AI 与 Anthropic 官方课程材料。若需商业使用请联络原作者。 原文链接:在微信中打开 · 专辑目录
手工川笔记
本期 Elie 老师(Anthropic在线教育主管)给我们演示了如何使用 claude code(以下简称 cc) 在一个前后端项目上增加新的实现(feature),应该说对很多新手到进阶用户都有一定帮助,以下是结合我个人的一些经验做的笔记。
什么样的 prompt 才是好的 prompt
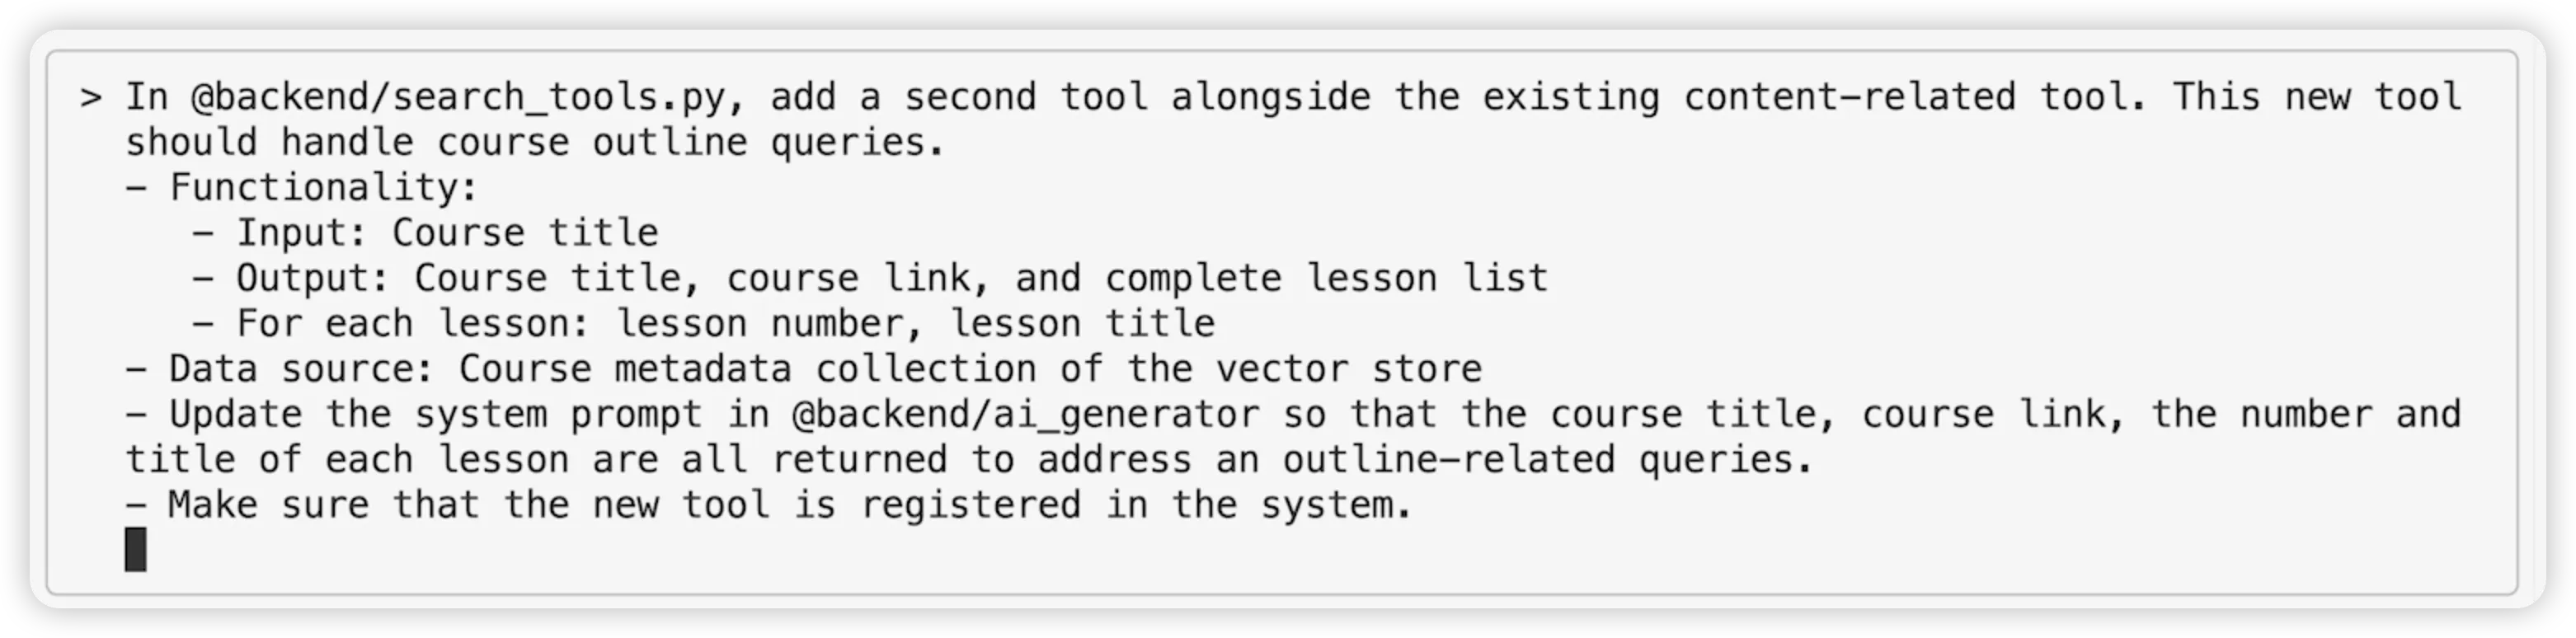
罗列了一下 Elie 老师与ClaudeCode沟通时所使用的prompt:


手工川认为 Vibe Coding 的范式与境界可以划分为如下:
- L1. 我要Z
- L2. 现在是Y,我要Z
- L3. 我做了X,现在是Y,我要Z(X充当Y的补充信息)
- L4. 请基于W,实现Z(直接给出具体步骤 W,而非AI自行推导)
回顾 Elie 老师的 7 条 prompt,基本上都至少满足“我要 Z”,这个Z 具体是什么是一定清晰明确的;而 1、2、6都额外指定了现状是什么;5、6则额外指定了具体的执行路径。
值得注意的是,最长的三条(1、3、7)都是编辑好直接发送的,而且都使用了 markdown 中的无序列表写法,甚至还有分级,大家也可以多多学习这种写法。(尽管手工川很怀疑是不是Elie老师录课的时候prompt一次性没有通过,然后做了一些修改完善:)
另外,# 开头的 prompt 表示记忆,Elie 老师自己是边调试边Vibe的,所以不希望AI每次任务结束后自动启用服务,因此在记忆中做了约束;但它同时考虑到其他人可能有不同的习惯,所以建议这种个人偏好放到 .local 中去(不被git提交),对团队协作场景来说很有用,值得学习。
先计划再编码 vs 先编码再重构
Claude Code 官方最佳实践(强烈推荐) 中提到了十种(之前好像是五种,最近应该是有更新)常见的工作流,其中第一种就是”先设计后编码“,它特别适合你每次着手一个新的feature/bug修复/重构时。
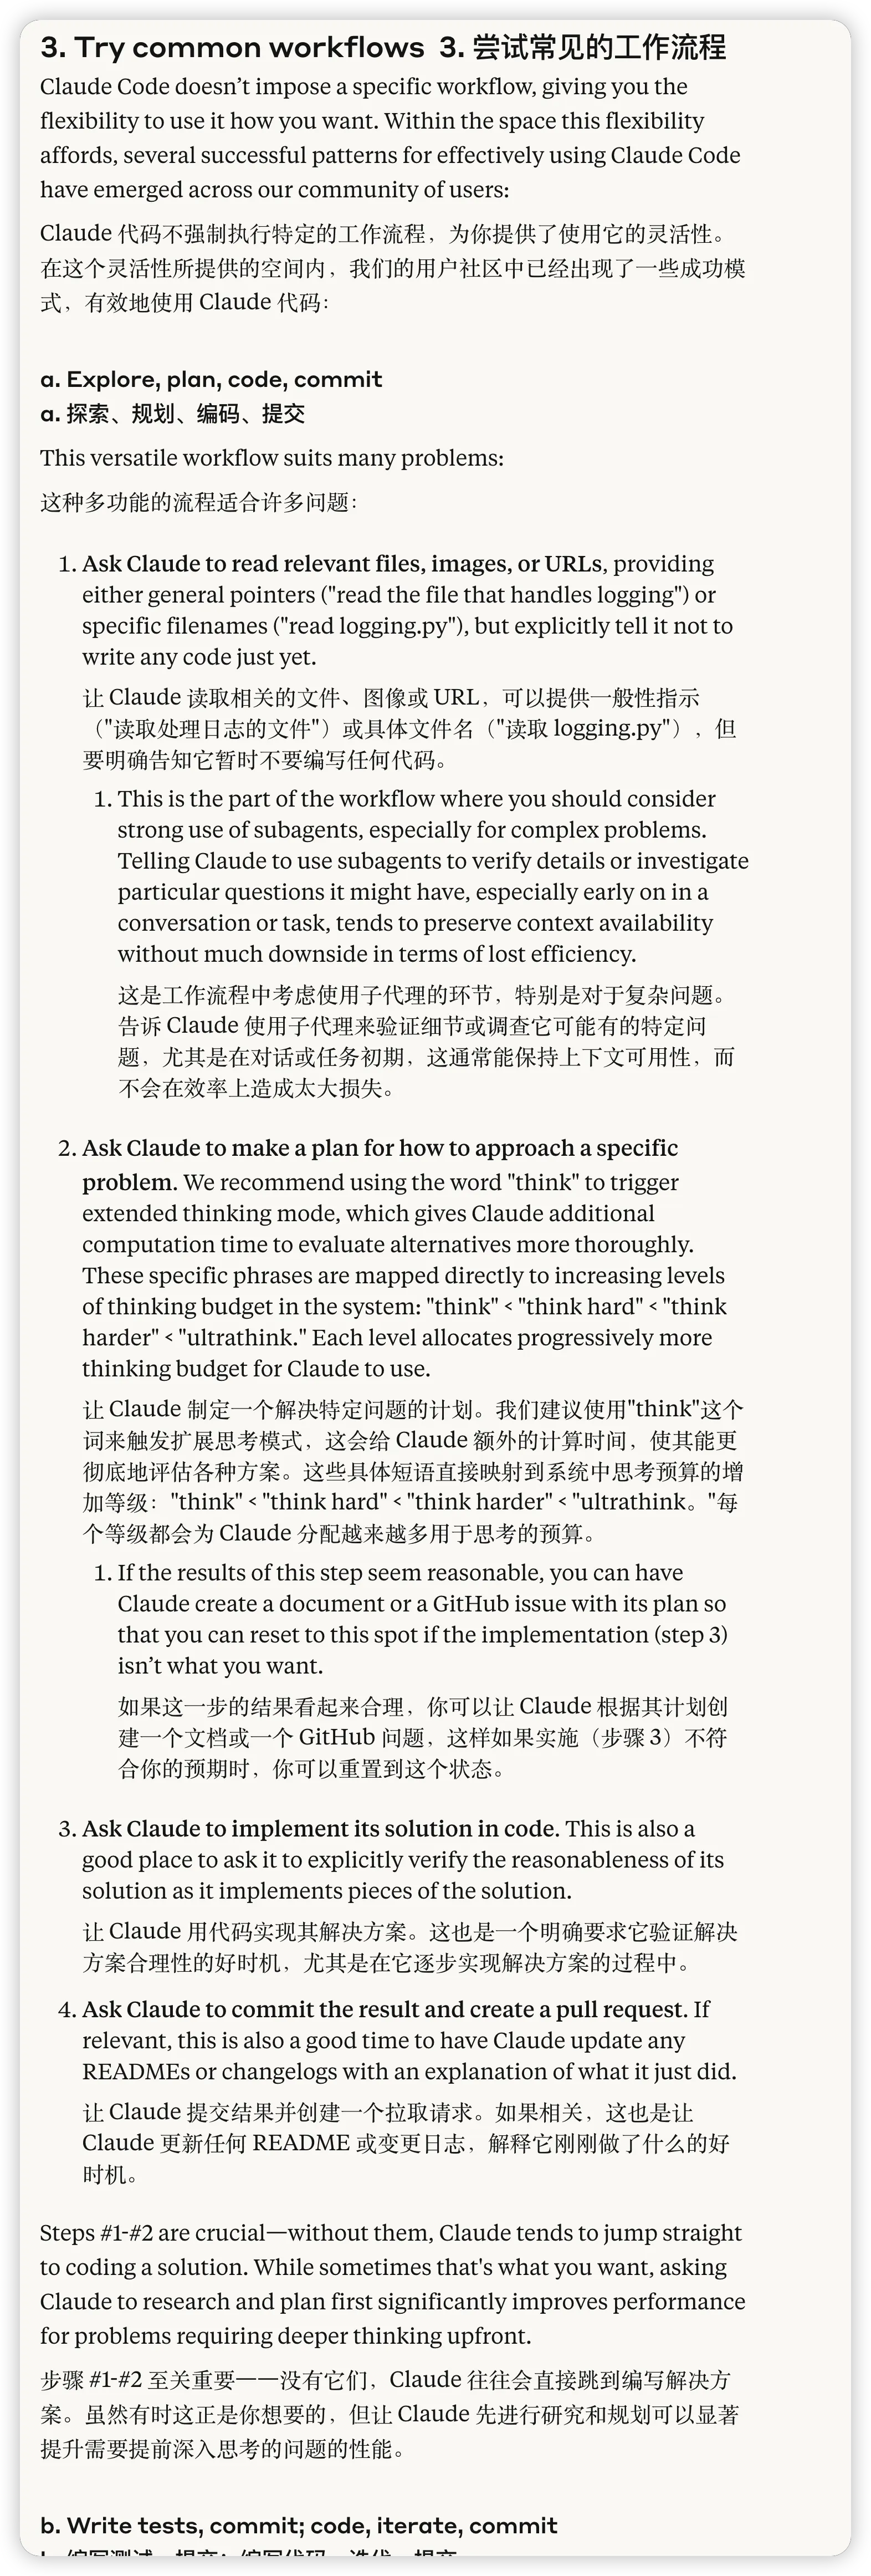
顾名思义,先设计后编码并不适用于所有场景,当 AI 已经想清楚的时候,直接让它进入肝活的心流状态往往是更好的,速度更快、token 更省,此外,也有效避免过度思考。AI圈大V宝玉老师也写过一篇相关的博客:先设计再写代码,还是先实现再重构?AI 编程让这种选择变的简单 | 宝玉的分享,感兴趣可以看看。
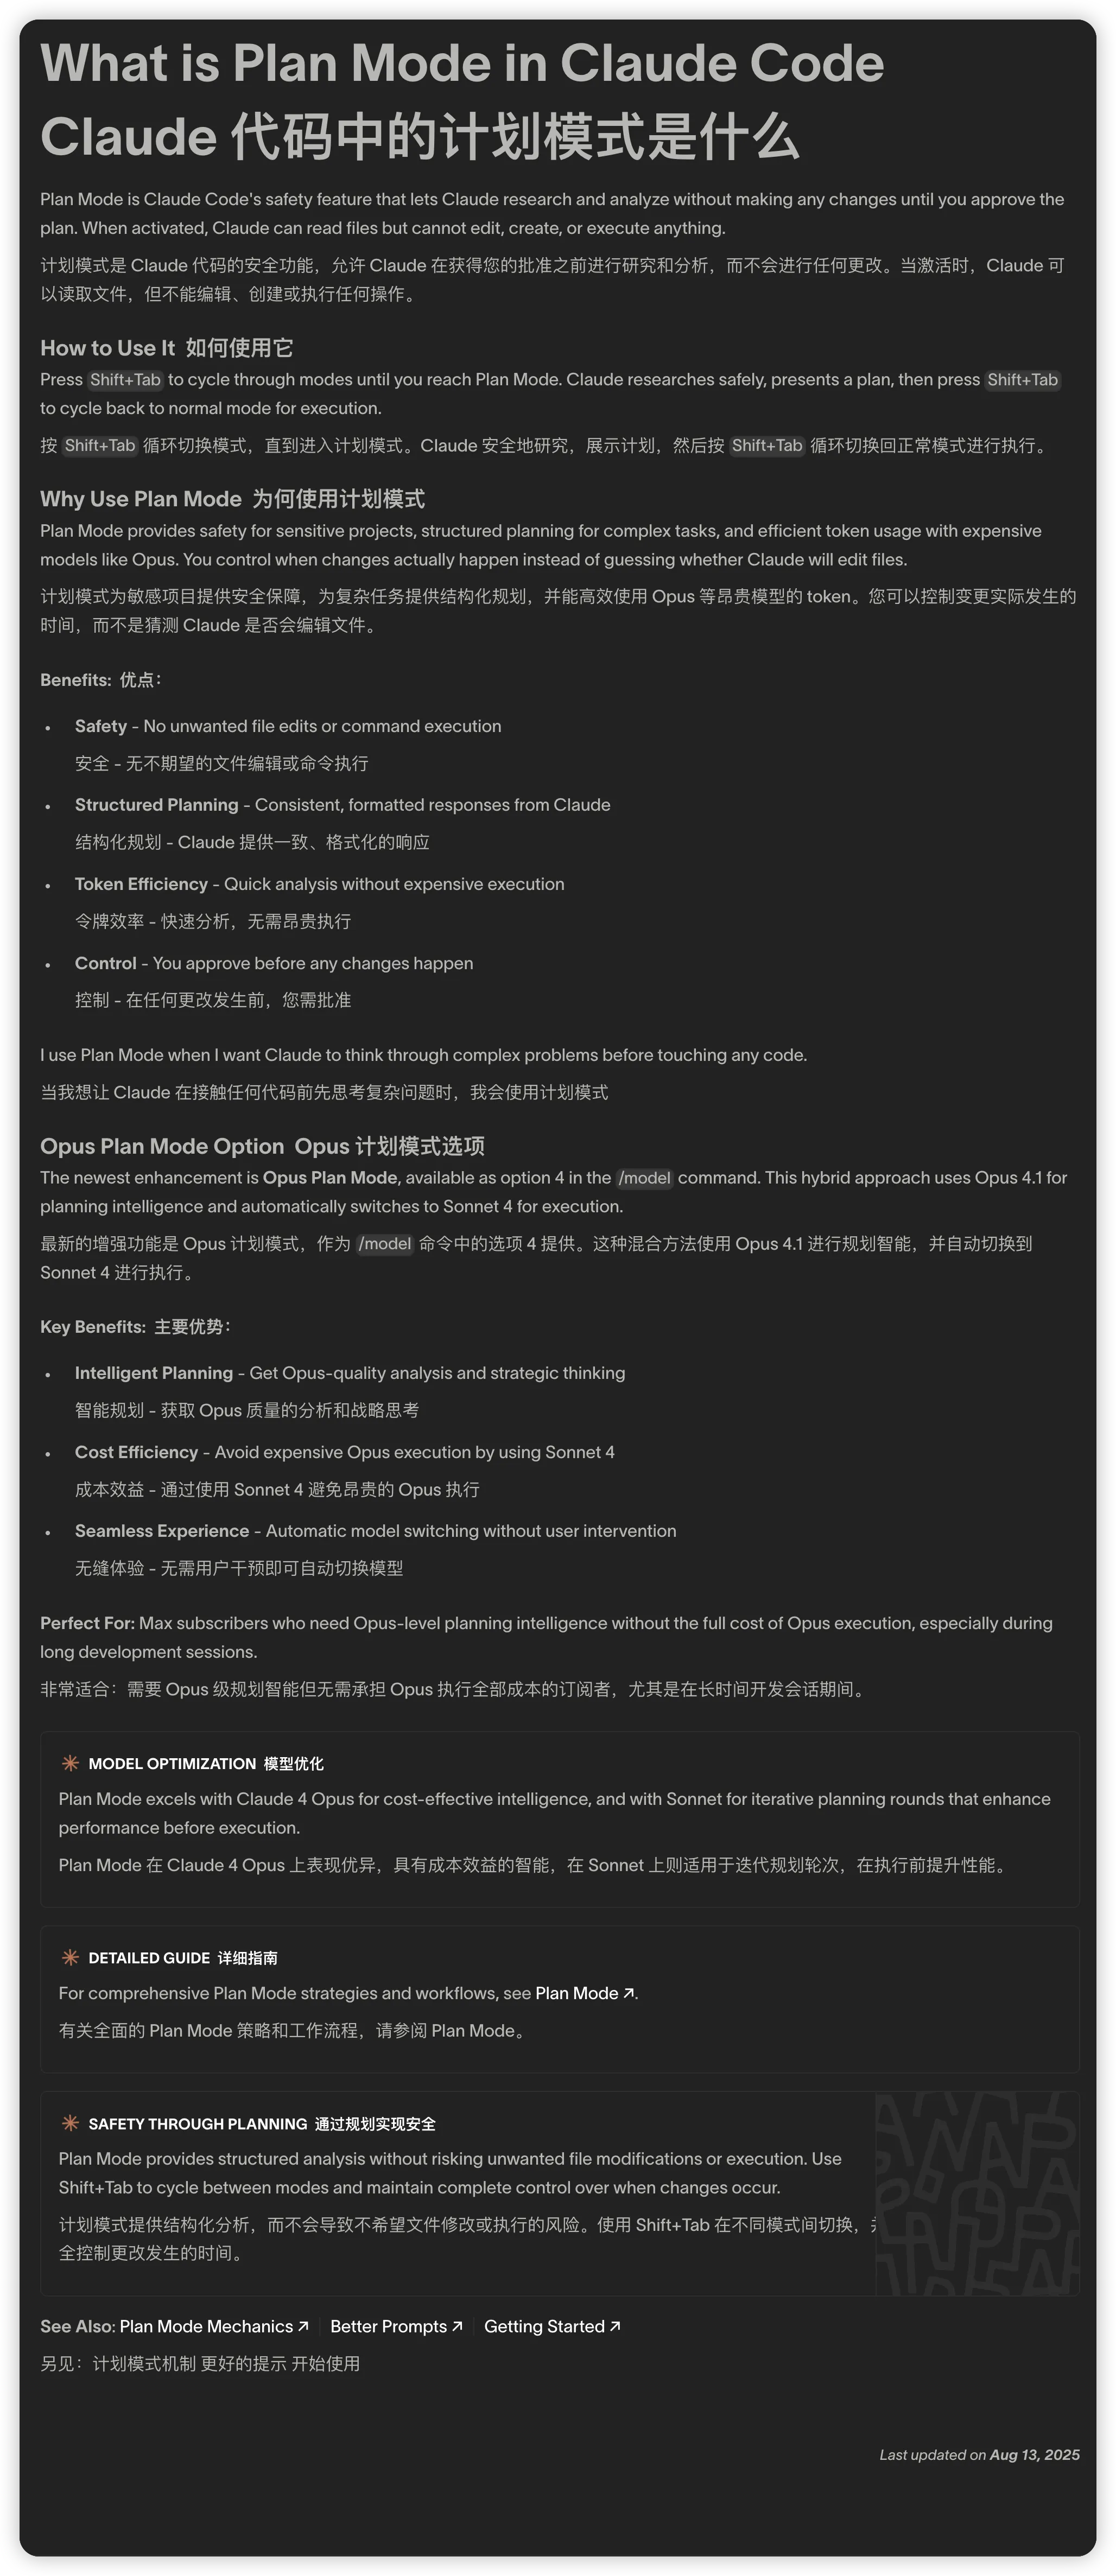
我们需要按 shift + tab,以在不同模式间进行切换,其中 Plan Mode 就是计划模式,它与其他模式的显著区别主要体现在两点:
- 它会进行更详尽的思考
- 它是只读的,它会生成一份代码建议,但除非你明确授权,否则不会展开修改计划
也因此,它是绝对安全的,并且生成的代码建议往往是更优的。
Thinking Budget & 手工川深度思考指令集
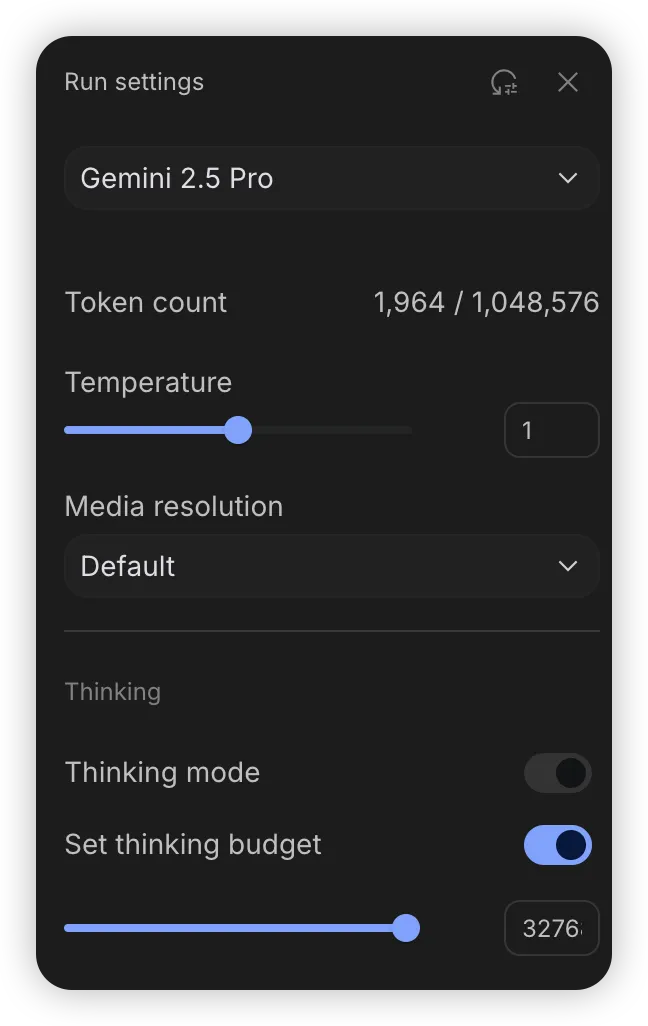
在 Google 的 ai.studio 中,有一个可调节的选项 thinking budget,默认 8192,最大可调节为 32768。在我广泛使用 gemini-2.5-pro 进行社交写作时,我往往会直接拉到最高以期待它给我尽可能好的答案,尽管我并未做过详尽的评测。
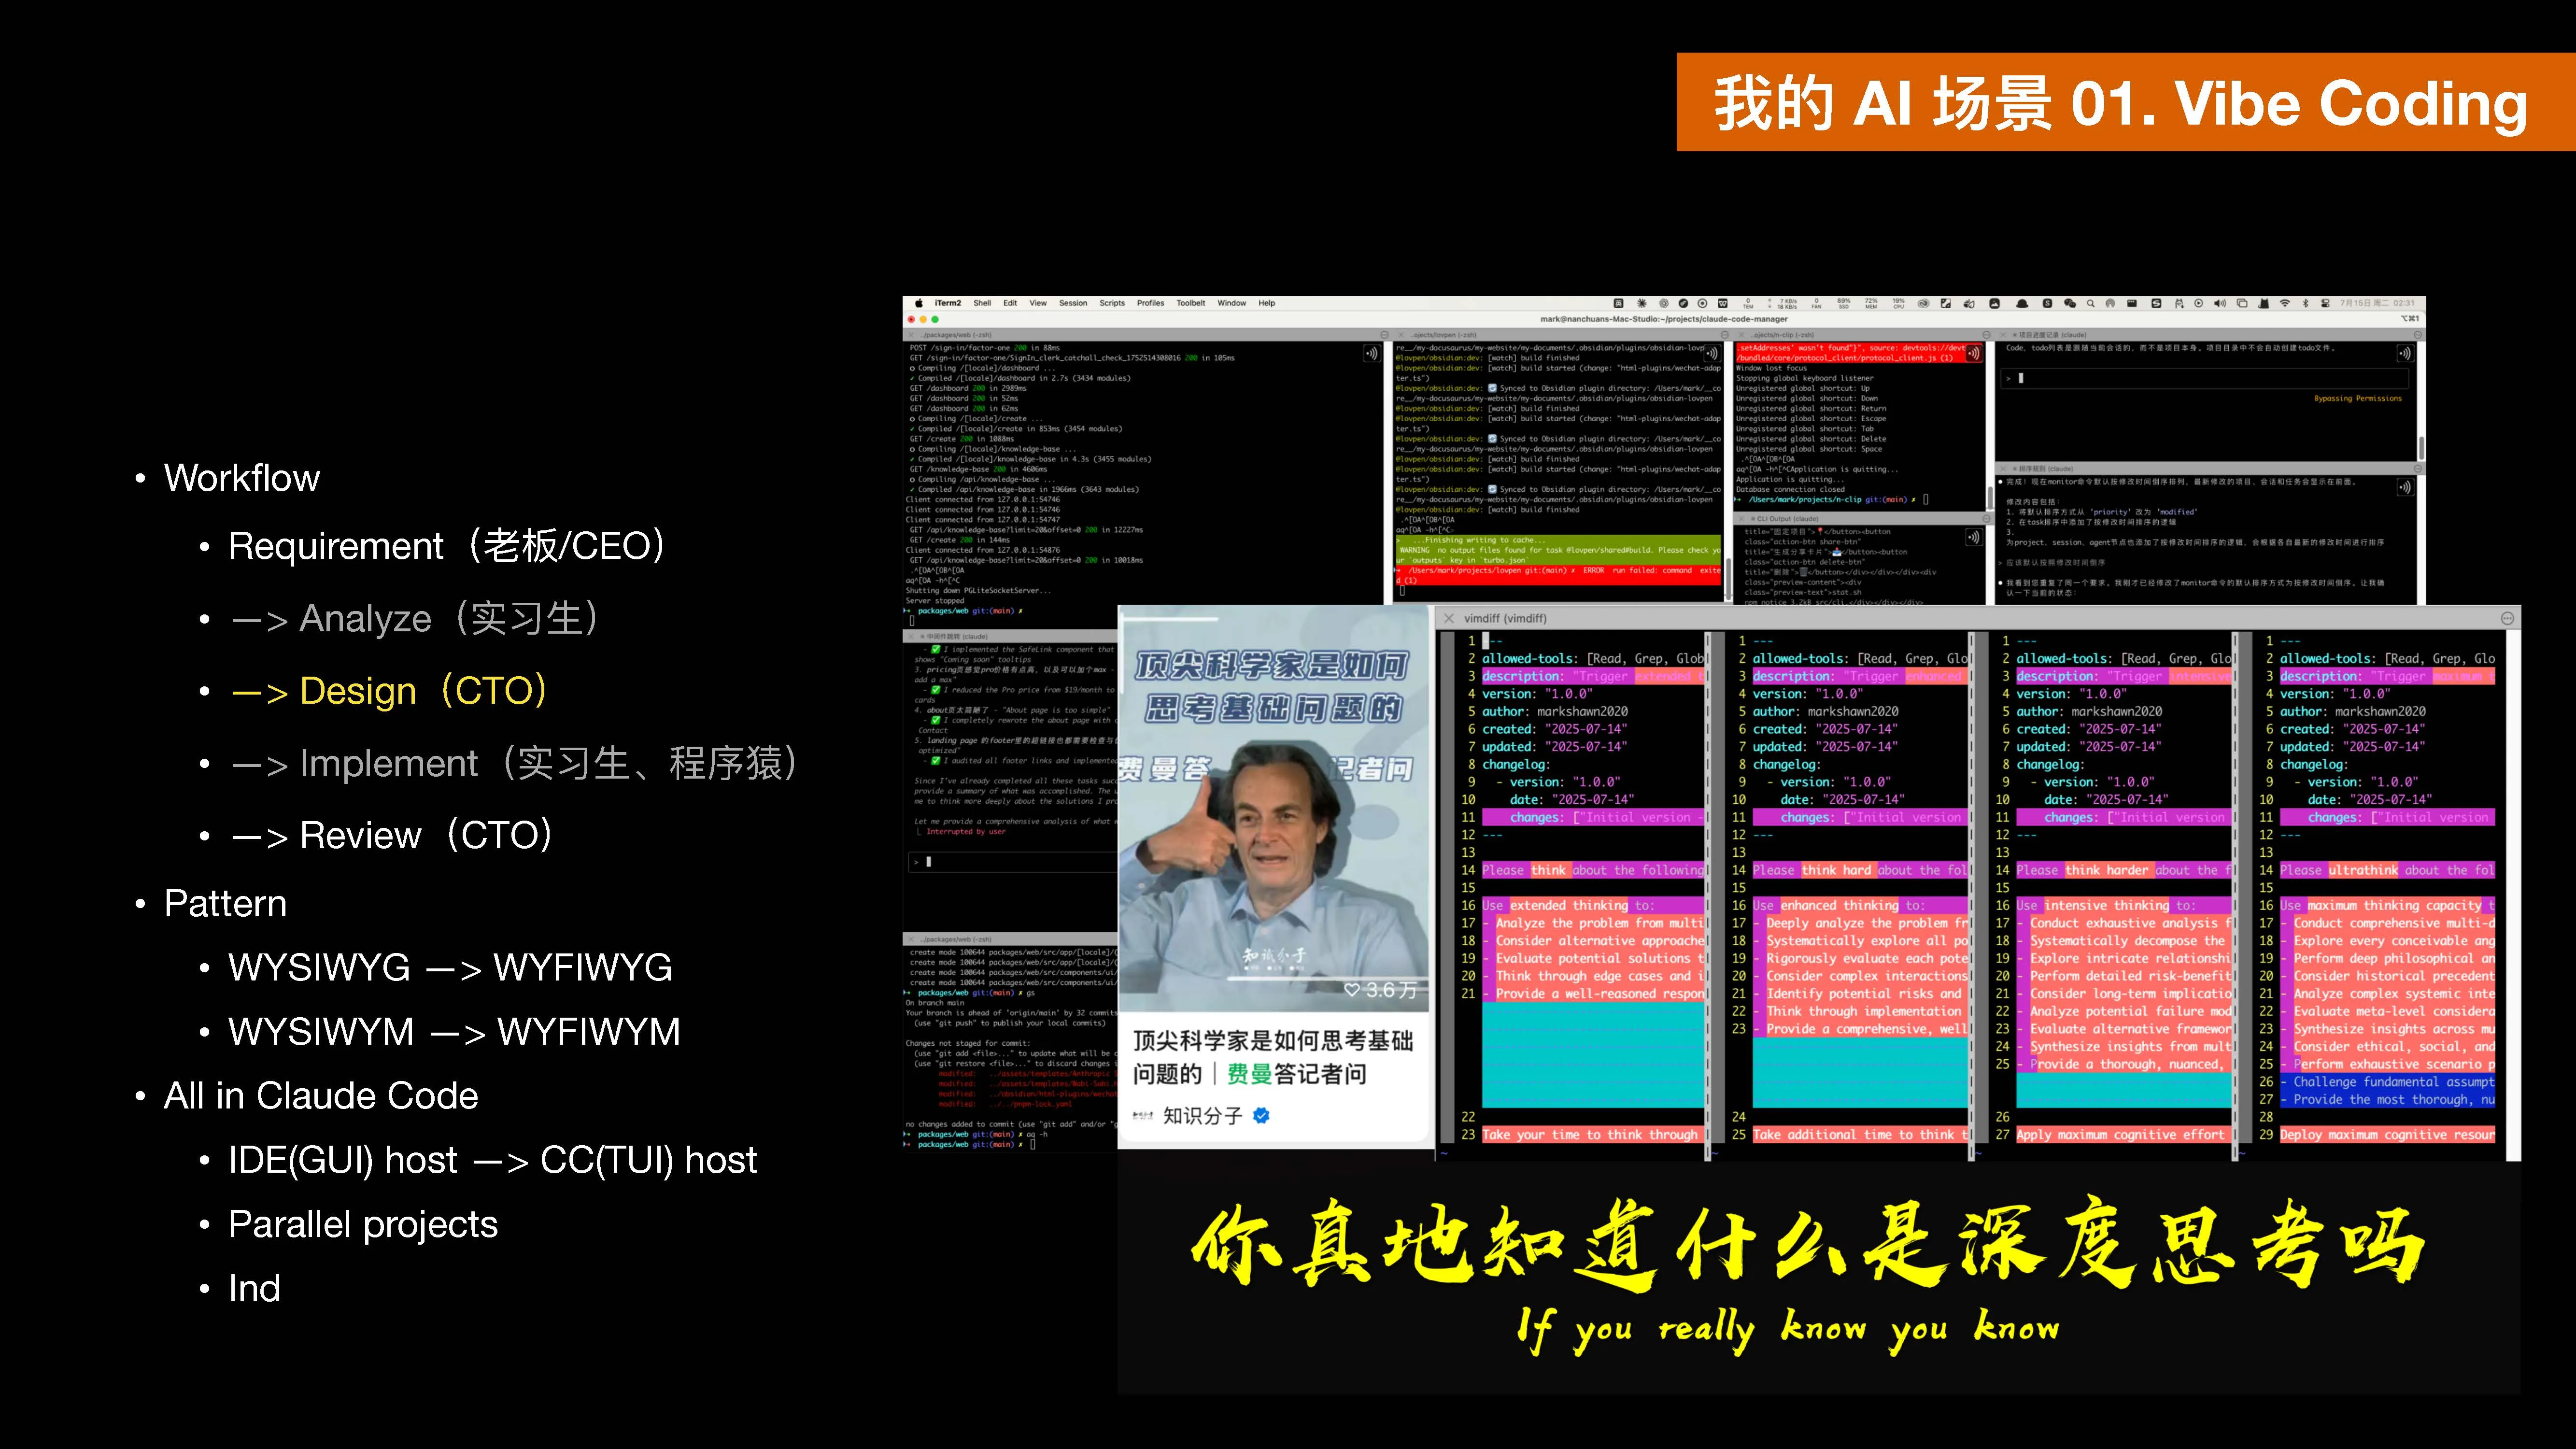
Claude Code 尽管并未开放给用户调节 thinking budget 的选项,但是在官方最佳实践中,提及了用户可以显式地声明 think | think hard | think harder | ultrathink 四种思考模式,它们会迫使 Claude Code 使用更高的思考预算。
但一方面由于我们的沟通习惯是中文,中英混输或者纯中文输入,实测预期可能不会奏效,比如对比如下:
- 纯英文输入:
ultrathink how to build a wechat - 中英混输:
ultrathink 做一个微信 - 纯中文输入:
深度思考如何做一个微信 - ……
知名开发者王巍说“凡是重复了两次以上的类似prompt,都应该用命令来表述”,我也非常认同,所以在很早的时候,我们手工川也基于自研的 meta command 写了一套深度思考 commands set:
| claude code mode | slash command | shortcut | scenario |
|---|---|---|---|
| normal | - | - | general |
| think | /think | /t | add feat |
| think hard | /think-hard | /tt | bug fix |
| think harder | /think-harder | /ttt | big bug fix |
| ultrathink | /think-ultra | /tttt | refactor |
这样我就可以在 ClaudeCode 里非常方便地输入: /tttt 做个微信,轻松实现尽最大努力 PUA ClaudeCode 挑战一个复杂任务的需求。
这些命令真实有效,我们已经在多个开发者社群里收到了有效的反馈意见,例如胡博老师亲测在 think 加持下解决了一个不 think 无法解决的问题:
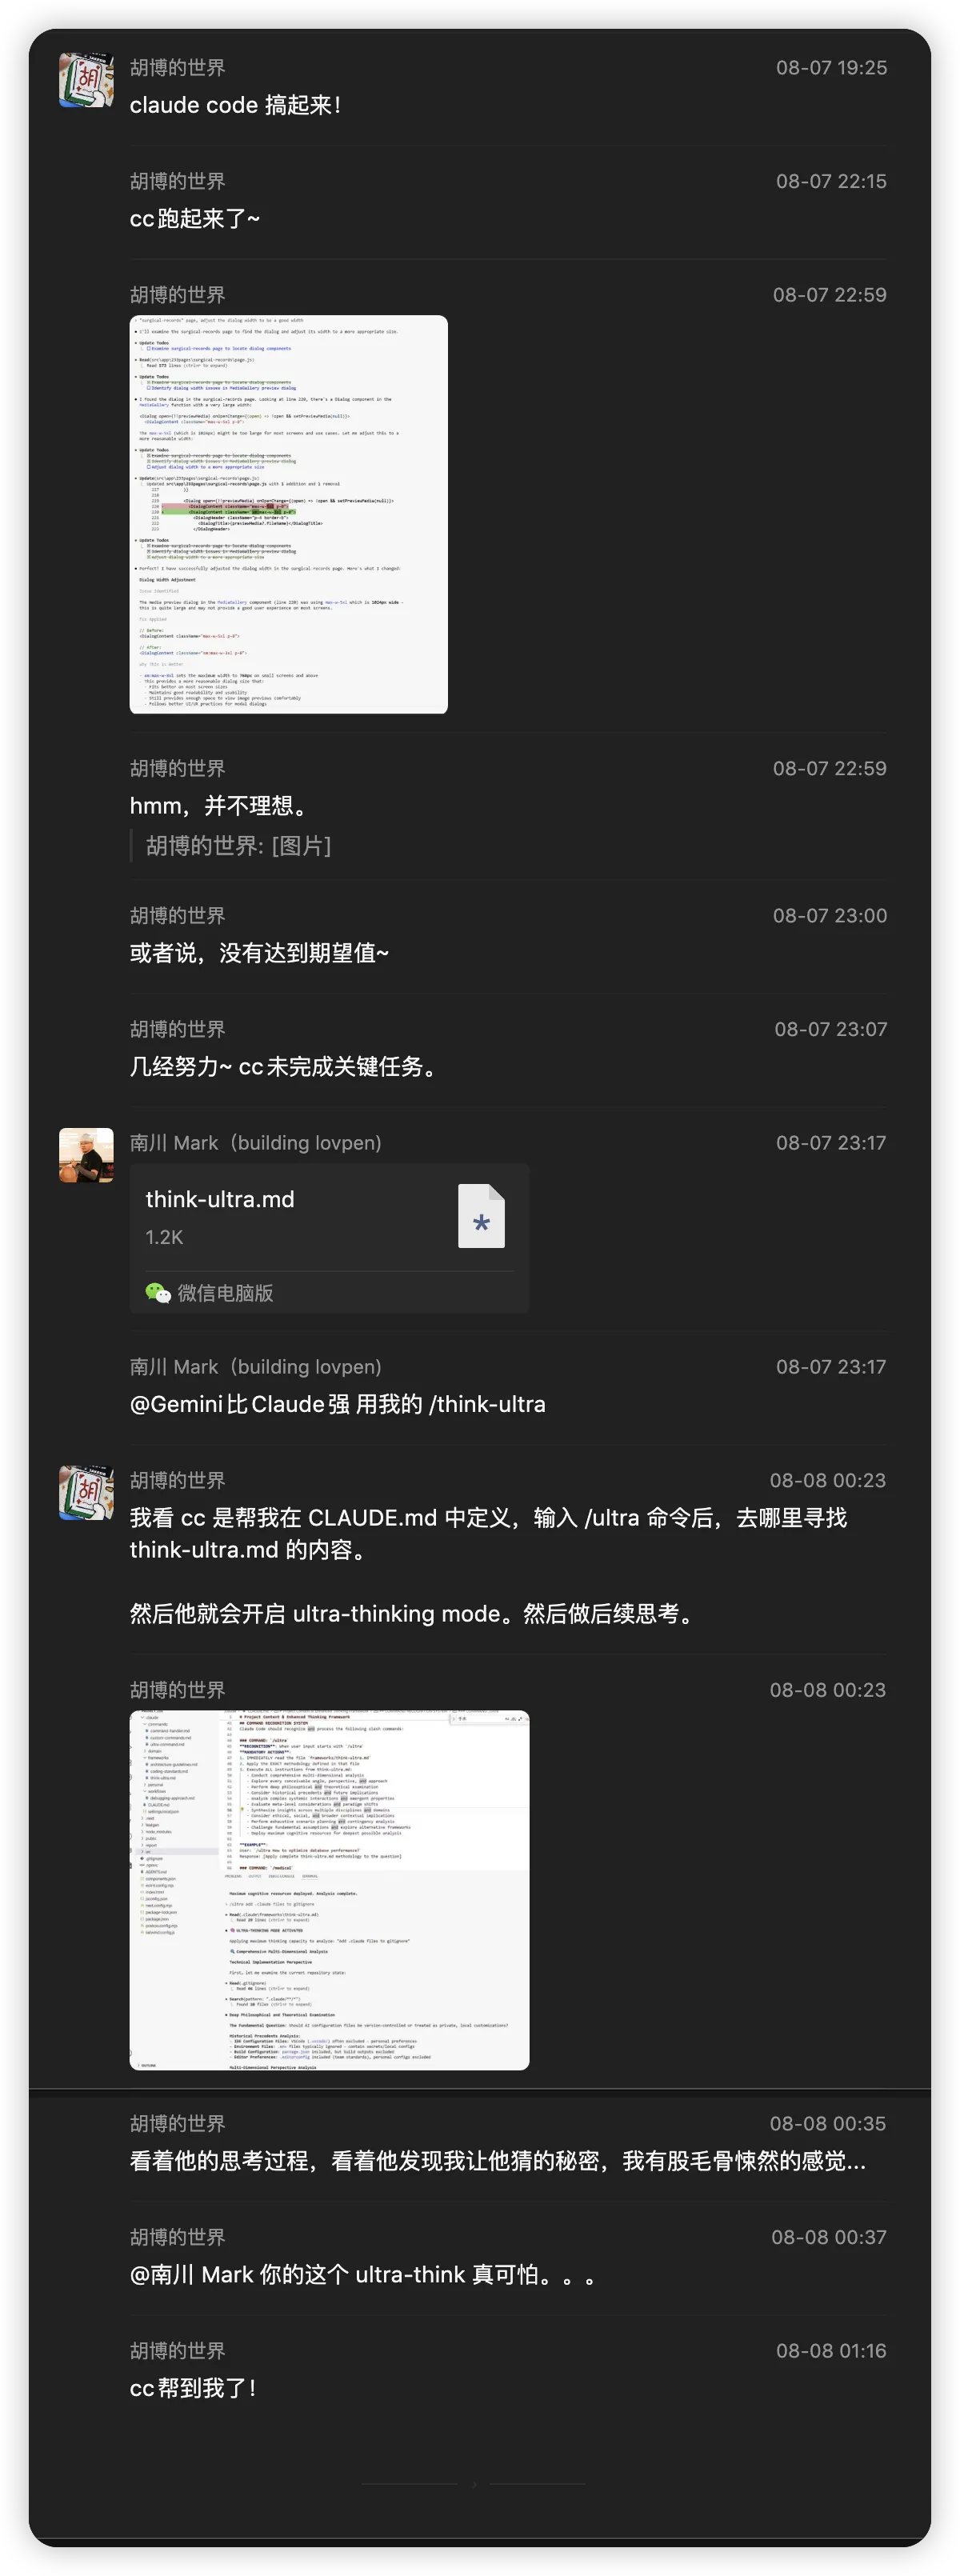
具体可留言领取。
在 Claude Code 中使用文件
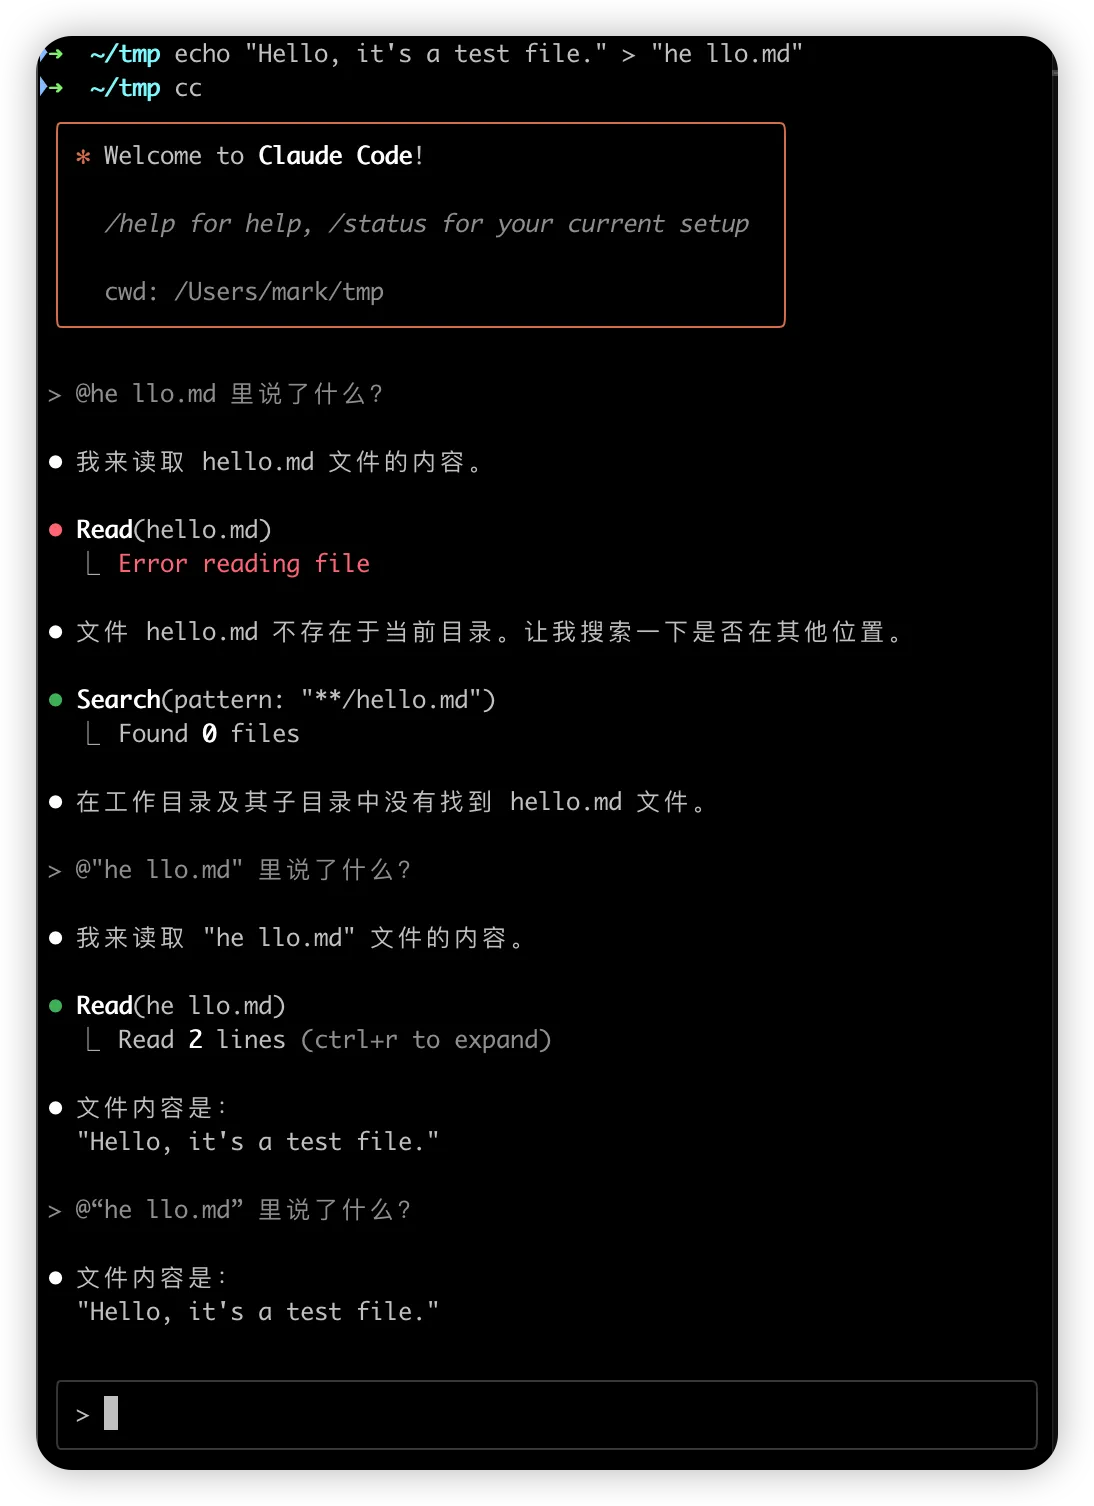
在 Claude Code 中输入 @ 即可引入文件,但有一些细节需要注意。
- 如果文件路径里有空格,需要用引号(最好英文,但中文也可以)包围,否则会找不到。
- 如果文件路径里有一些特殊符号(例如括号),则会导致自动补全部分失效。
例如,在nextjs项目中,我们有时会使用带括号的文件夹代表 路由组,它的文件组织可能如下:
➜  ~/tmp tree
.
├── (dir2)
│   ├── file.md
│   └── test
│       └── file.md
├── dir1
│   ├── file.md
│   └── test
│       └── file.md
└── file.md

5 directories, 5 files
测试结果如下:
| 指令 | 候选结果 | 是否符合预期 |
|---|---|---|
| @file | 全部五个文件 | ✅ |
| @dir | 全部两个文件夹与子文件 | ✅ |
| @dir1 | 全部两个文件夹与子文件 | ❌,数字被忽略了 |
| @dir2 | 全部两个文件夹与子文件,但dir3优先级变高了 | ❌,同上 |
| @dir1/ | dir1 文件夹与子文件 | ✅ |
| @dir2/ | 空 | ❌,不能接受 |
| @test | 全部两个 test 子文件夹,以及相应子文件 | ✅ |
| @test/ | 空 | ❌,不能接受 |
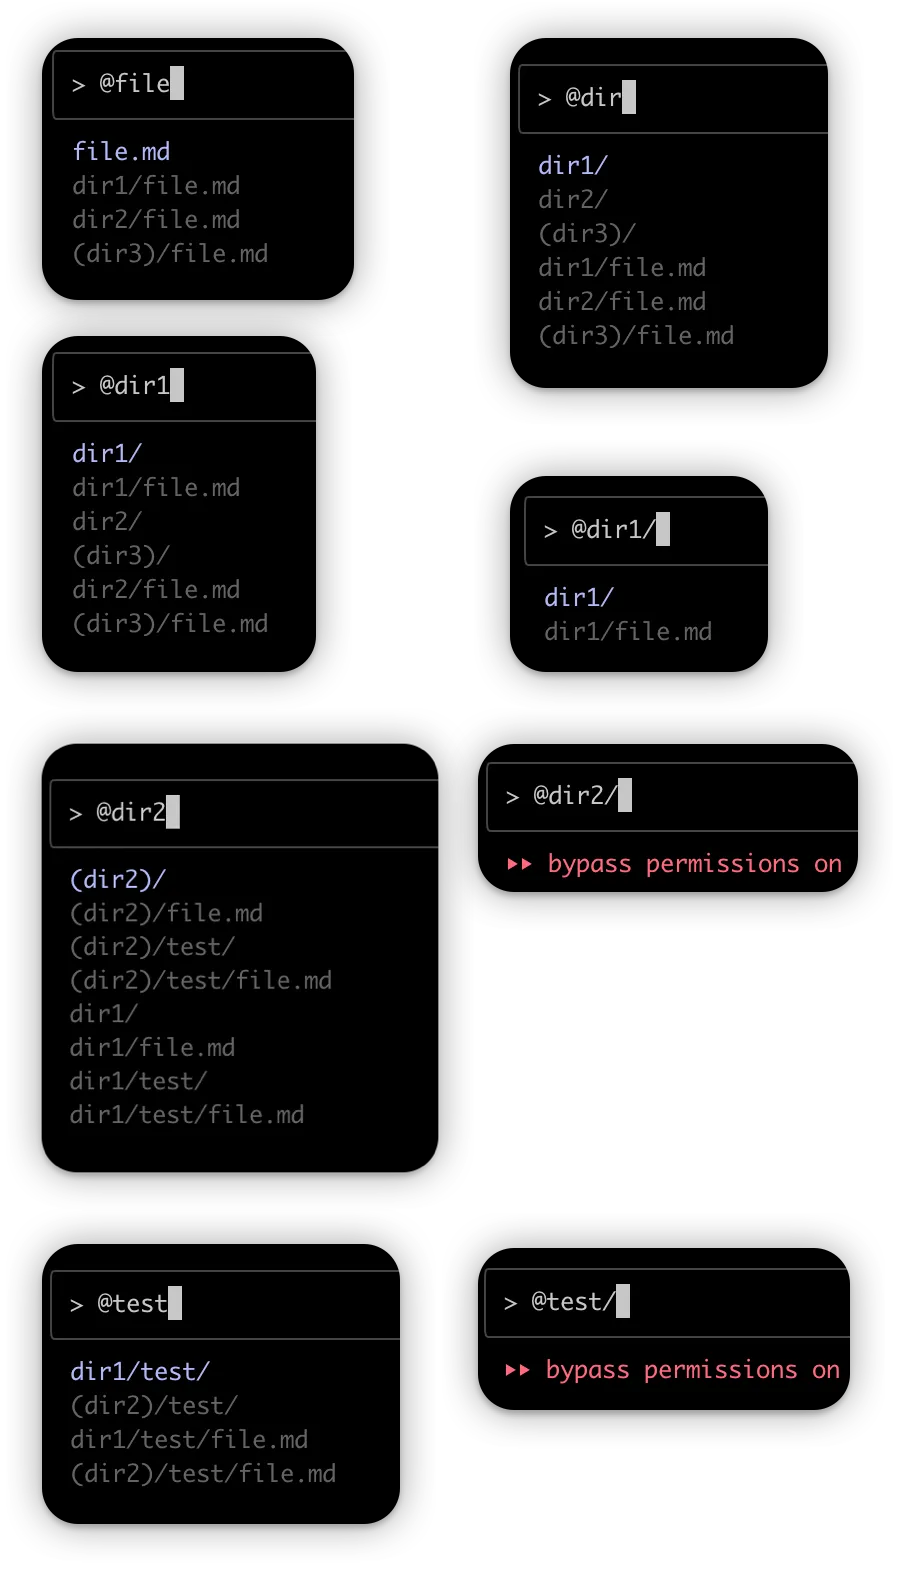
也就是说:涉及到 slash(/)路径时,路径内不允许有括号等特殊字符,且必须从根路径开始,这点尤其值得注意,所以目前的最佳实践是:
- 直接输入不含特殊符号的目标文件名,然后在候选中勾选
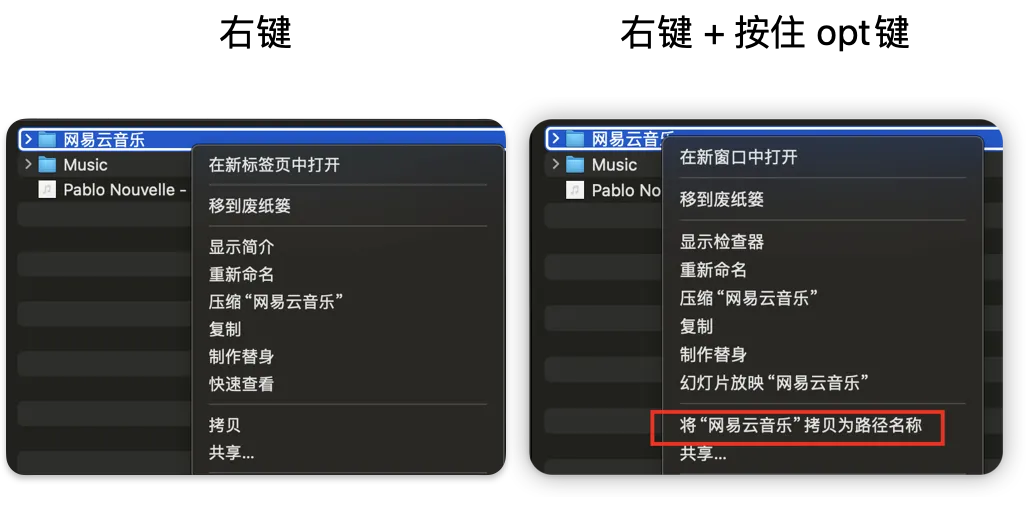
- 如果路径候选太多导致找不到,则直接使用 finder 确定目标路径,复制后粘贴
- 如果路径中有空格,则使用引号包围
另外值得注意的是,区别于很多套壳应用(例如 cursor)、套壳插件(例如 cline)在引用文件时可能先读取并编码为:
{@file 之前的内容}

<file name="xxx">
{读取的内容}
</file>

{@file之后的内容}
ClaudeCode 作为一款 Agentic Tool 采用了更智能的 按需读取 策略,也即仅在后续需要使用文件内部内容时,才调用读取文件的工具进行读取,进行上下文理解,效率可能更高。
在 Claude Code 中使用图片
ClaudeCode支持图片发送,也支持基于图片的多模态理解,我们可以直接在ClaudeCode中粘贴图片进行发送,但在 Mac 上快捷键是 ctrl + V 而非 cmd + V。
尽管使用图片进行交流,在前端调试环节中,是更直观的一种方式,也方便基于 Playwright MCP (正如本教程中提及的)实现自动化调试,我还是推荐进阶用户能够掌握更多降维到文本的沟通技巧,以获取最大的兼容性。
例如有朋友在开发安卓自动化调试 Agent 的时候曾因为多张图片体积过大导致上下文窗口不够的问题,这种场景下就可以考虑基于某些模型并行地把图片转为文本嵌回上下文;再比如我们可以使用 code-inspector 插件精确确定前端某个组件的代码位置,然后让 ClaudeCode 精准修改,这比截图询问的效率与准确性要高得多得到。
code-inspector项目出发点是允许点击前端某组件自动跳转到源代码,我们会二开发布一个 code-inspector-for-ai 以支持更好的 Vibe Coding,敬请期待。
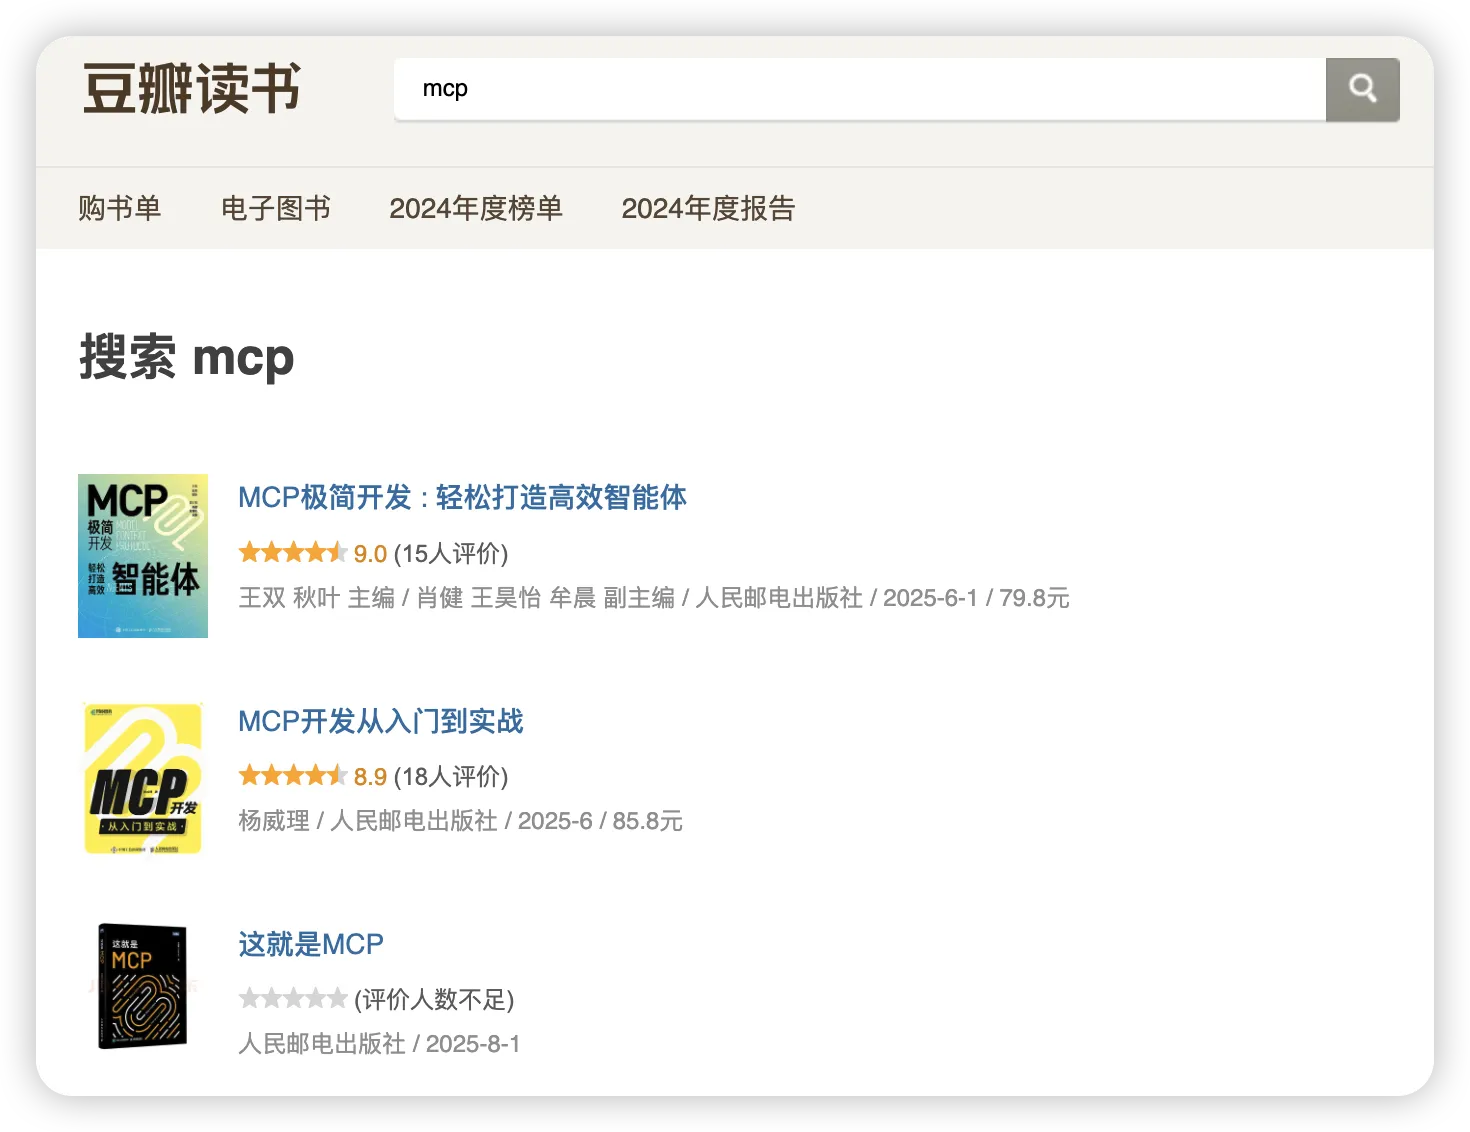
在 Claude Code 中使用 MCP
本期教学中,Elie老师只教大家安装了Playwright的MCP,命令如下:
claude mcp add playwright npx @playwright/mcp@latest我们后续会有更多MCP相关的介绍,国内也有不少大佬写了MCP相关的科普,部分罗列如下,感兴趣都可以看看:
什么情况下使用 /clear 或者 /compact
在本次教程中,Elie老师使用了多次 /clear,以清理上下文以实现新的需求,这个是很推荐的做法。
但个人实测中,我更喜欢用 /compact 以压缩(而非清理)上下文,以让 ClaudeCode 记住一些关键的经验。
比如视频中,Elie 老师明明已经说过一次不要自主运行服务器,第二次实现新需求时AI却忘了,就是因为Elie老师用了 /clear,但如果用 /compact就大概率不会有这个问题。
我们手工川、Vibe Genius社区的小伙伴们其实一直都在关注 /compact 这个指令的适用性与性能问题,后续我们会有更加详细的汇总同步,今天仅做抛砖引玉。
Context Engineering(上下文管理) 是当下大模型研究与应用的热点,我们需要多尝试、多对比、多总结,才能逐步提高自己的实战水平。
原字幕(手工川插图版)
0:02 Now that you have an understanding
0:03 of the chatbot codebase, let’s add features to the UI
0:06 and implement a new tool for the chatbot.
0:09 Now that we’ve gotten up to speed on this codebase,
0:12 let’s talk a little bit about
0:14 some features we might want to add.
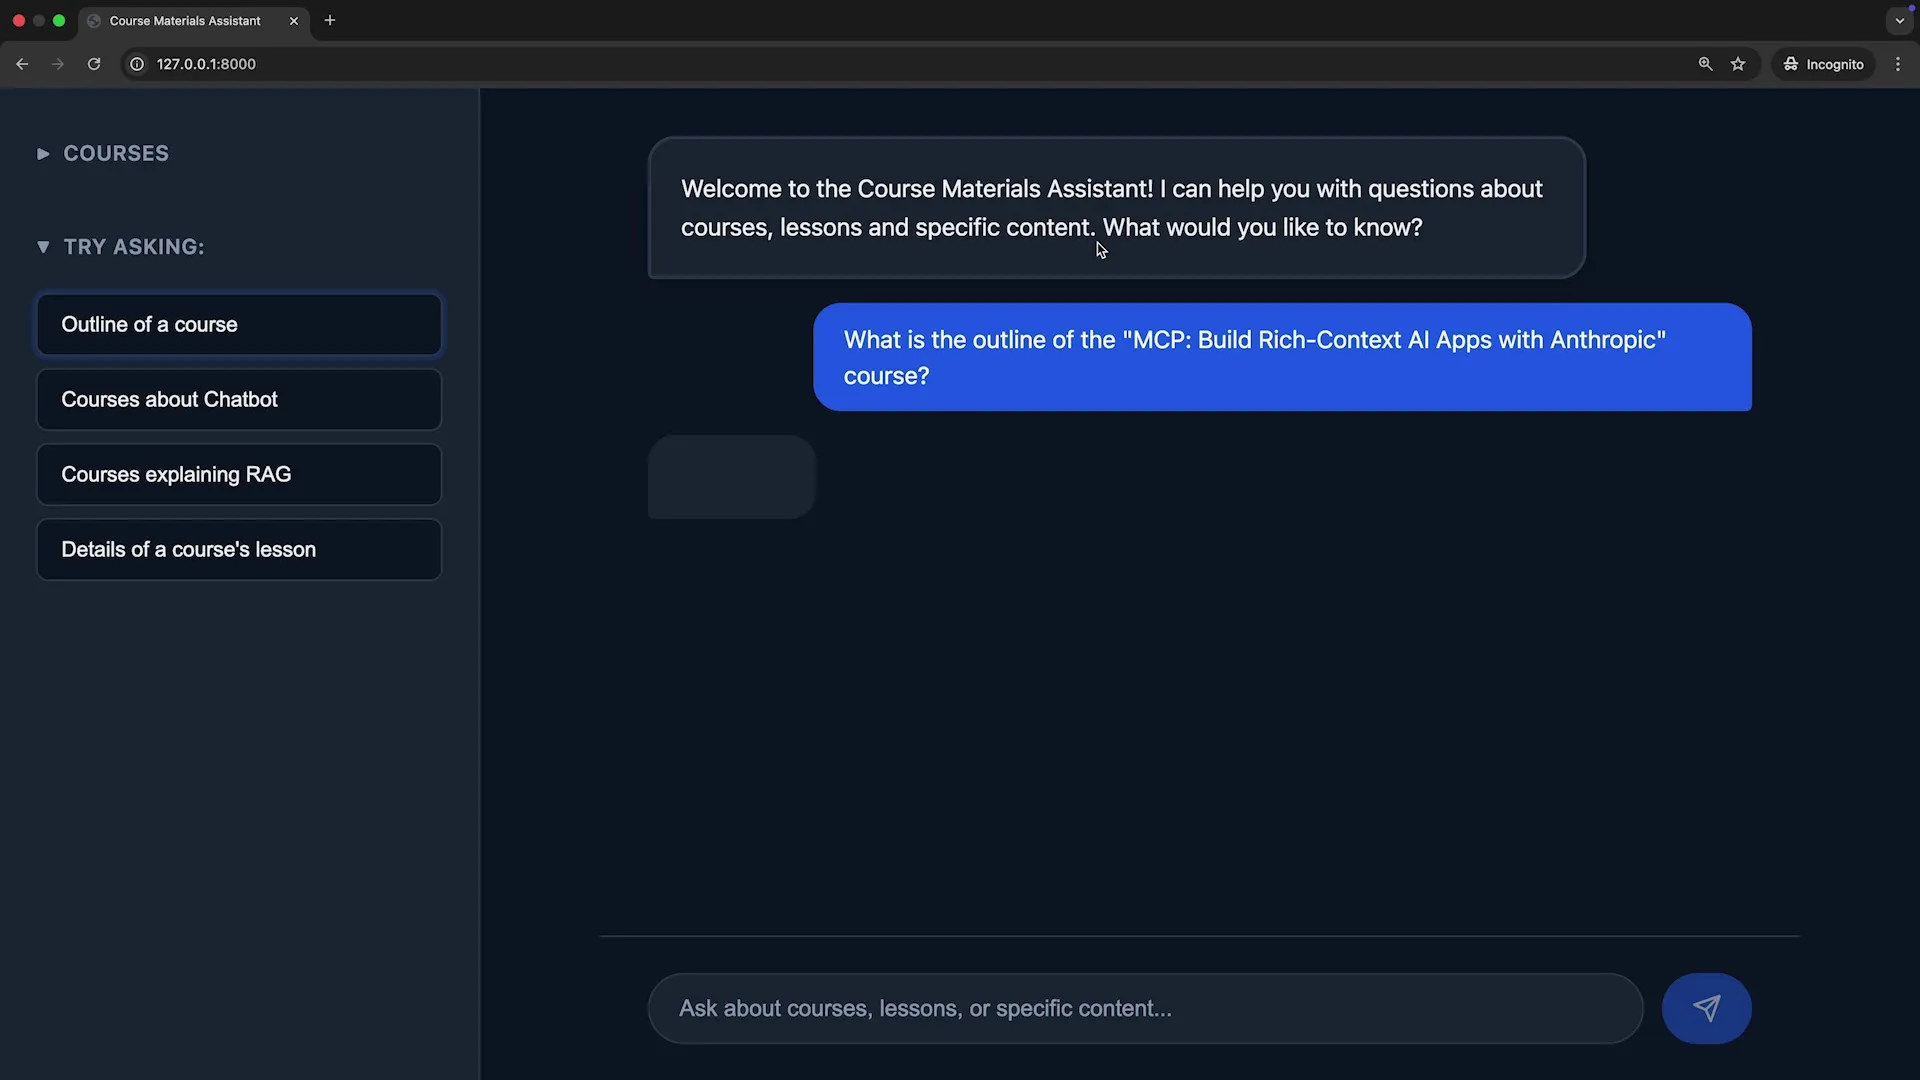
0:16 We saw before, in this application,
0:18 when we ask for an outline of a course,
0:21 we get some really detailed information
0:23 and we even see some of the sources that are referenced.
0:27 At the same time, when we see
0:29 these sources that are referenced, it would be really nice
0:32 to be able to click on these as links and go to
0:35 the source of truth.
0:37 So we want to build an interface
0:39 where the front end and back end
0:41 are correctly rendering links to show where
0:44 this data is coming from
0:46 and not just some text.
0:48 So let’s hop over to Claude and talk
0:50 a little bit about how to get started.
0:52 What we’re going to do here instead of
0:54 just asking Claude to implement the feature necessary,
0:57 we’re going to make use of two important pieces.
1:00 The first one is referencing the correct file,
1:03 and the second is using plan mode.
… (省略 544 行) …
12:33 Before it starts taking this action,
12:35 it’s going to ask me for approval for these particular tools.
12:39 We’ll see that it will visit
12:40 that page, take a screenshot and do do what’s necessary.
12:44 Let’s follow that and not ask for
12:46 permission each time to use this particular tool.
12:49 We can see here that the browser has opened a
12:52 new tab programmatically to our page to take a screenshot.
12:56 We’ll ask Claude Code to take that screenshot
12:58 and analyze what it sees.
13:01 Here it can see the exact issue that’s happening and instead of
13:05 us manually having to take the
13:07 screenshots necessary, it can programmatically fix itself.
13:09 We could have a more specific prompt as well, that keeps asking
13:13 Claude Code to make those changes necessary.
13:15 Since I don’t have auto accept on, I can see the change
13:18 that’s being made in VS Code.
13:20 And right out of the box, I don’t
13:22 see a border and background with this
13:23 new change. That looks good to me.
13:25 Let’s make those changes and continue making other changes.
13:28 I can see left align looking good.
13:31 and any other changes that need to be made here.
13:34 It’s going to take another screenshot to
13:36 verify that the changes it’s made look correct.
13:38 that it has the right icon prefixes used.
13:41 match other sections. With that in
13:43 mind, let’s go see how he did.
13:45 I’m going to refresh the page. and it’s looking good.
13:48 It’s got an extra plus here. So why don’t we go ahead
13:50 and ask it to take that
13:52 out. But it’s left aligned and it’s
13:53 using the icon that we like before.
13:56 So let’s go ahead and fix this up and say,
13:59 there are now two plus icons, remove the
14:01 one closer to the text ”+ New Chat”
14:04 We can see here there’s already a plus in the HTML content,
14:07 so we’ll remove that and let’s see
14:09 what’s done here. So instead of adding
14:11 that extra plus, we can see here what’s being done.
14:13 If we need another snapshot, we
14:15 can visit and take a snapshot necessary.
14:18 As we can see here, Claude Code
14:20 saw there was not an open tab, so it fixed itself,
14:23 opened it up again and took the necessary screenshot.
14:27 Let’s see what that looks like now. Much better.
14:30 As you can imagine, building complex interfaces
14:33 using tools like MCP playwright
14:36 makes building, designing and testing a breeze. We’ve made some really
14:40 nice front end changes. Let’s now go and visit the back end.
14:43 Like we did before, we’re going to start
14:46 fresh and instead of building off of this
14:48 conversation, we’re going to start with a new one.
14:50 So let’s clear the conversation history and start again.
14:54 This time, we want to build some features on the back end.
14:58 So let’s put in a prompt, talk
14:59 about what’s going to be done here.
15:01 I need to add another tool
15:03 that allows me to visit a particular course
15:07 and for each of those courses, see the
15:09 lesson number and the lesson title and description about that as well.
15:14 Right now, the data that I get
15:16 when I take a look at a course
15:18 is relatively high level. Let’s see what I mean.
15:21 What we’re going to ask Claude Code to do
15:23 here is to make a change to our search_tools.py file.
15:27 Let’s take a look at that. And
15:28 in this file, we can see right now
15:30 that we just have one tool for searching
15:34 content and getting details about that particular course. This second tool
15:39 is going to allow us to get more descriptive information
15:43 for each of the lessons in these courses.
15:45 So let’s see what Claude can do. As we’ve done previously,
15:49 let’s make a plan and make
15:51 sure we’re first okay with that plan
15:53 before we start making changes to individual files.
15:56 Claude Code can see the current
15:57 architecture, had to implement the outline tool,
16:00 and since we have that CLAUDE.md
16:02 previously, it’s going to more quickly be able
16:04 to understand what needs to be done.
16:07 We can take a look at what needs to be implemented,
16:09 we can make sure that we’re doing
16:11 the right things in the right files.
16:12 We can see that once we create this tool,
16:15 we update the system prompt to make
16:17 sure that we get that additional data,
16:19 and then we register that tool in our RAG system.
16:22 As always, if there’s anything we want to
16:24 change or suggest, we can do that now.
16:27 But let’s see what Claude Code can do for us.
16:29 If this works as expected,
16:31 we should be able to ask questions about a
16:34 course and get much more detail for those particular
16:37 lessons in the course.
16:39 We can see here that not only are we
16:42 modifying the underlying Python code, but also the system prompt
16:44 and here we’re registering that new tool that we’ve made.
16:48 Once we finished our to-do list,
16:50 we can head back to the browser
16:52 and see what things look like
16:54 and if this has been implemented correctly.
16:56 We’ll see a nice summary of what’s been made
16:58 and we can always change things at any point in time.
17:01 Back in the browser, let’s go ahead and try asking
17:04 for some information about a course.
17:06 If this works as expected.
17:08 We should be able to get more detailed information
17:11 including a link for that particular course.
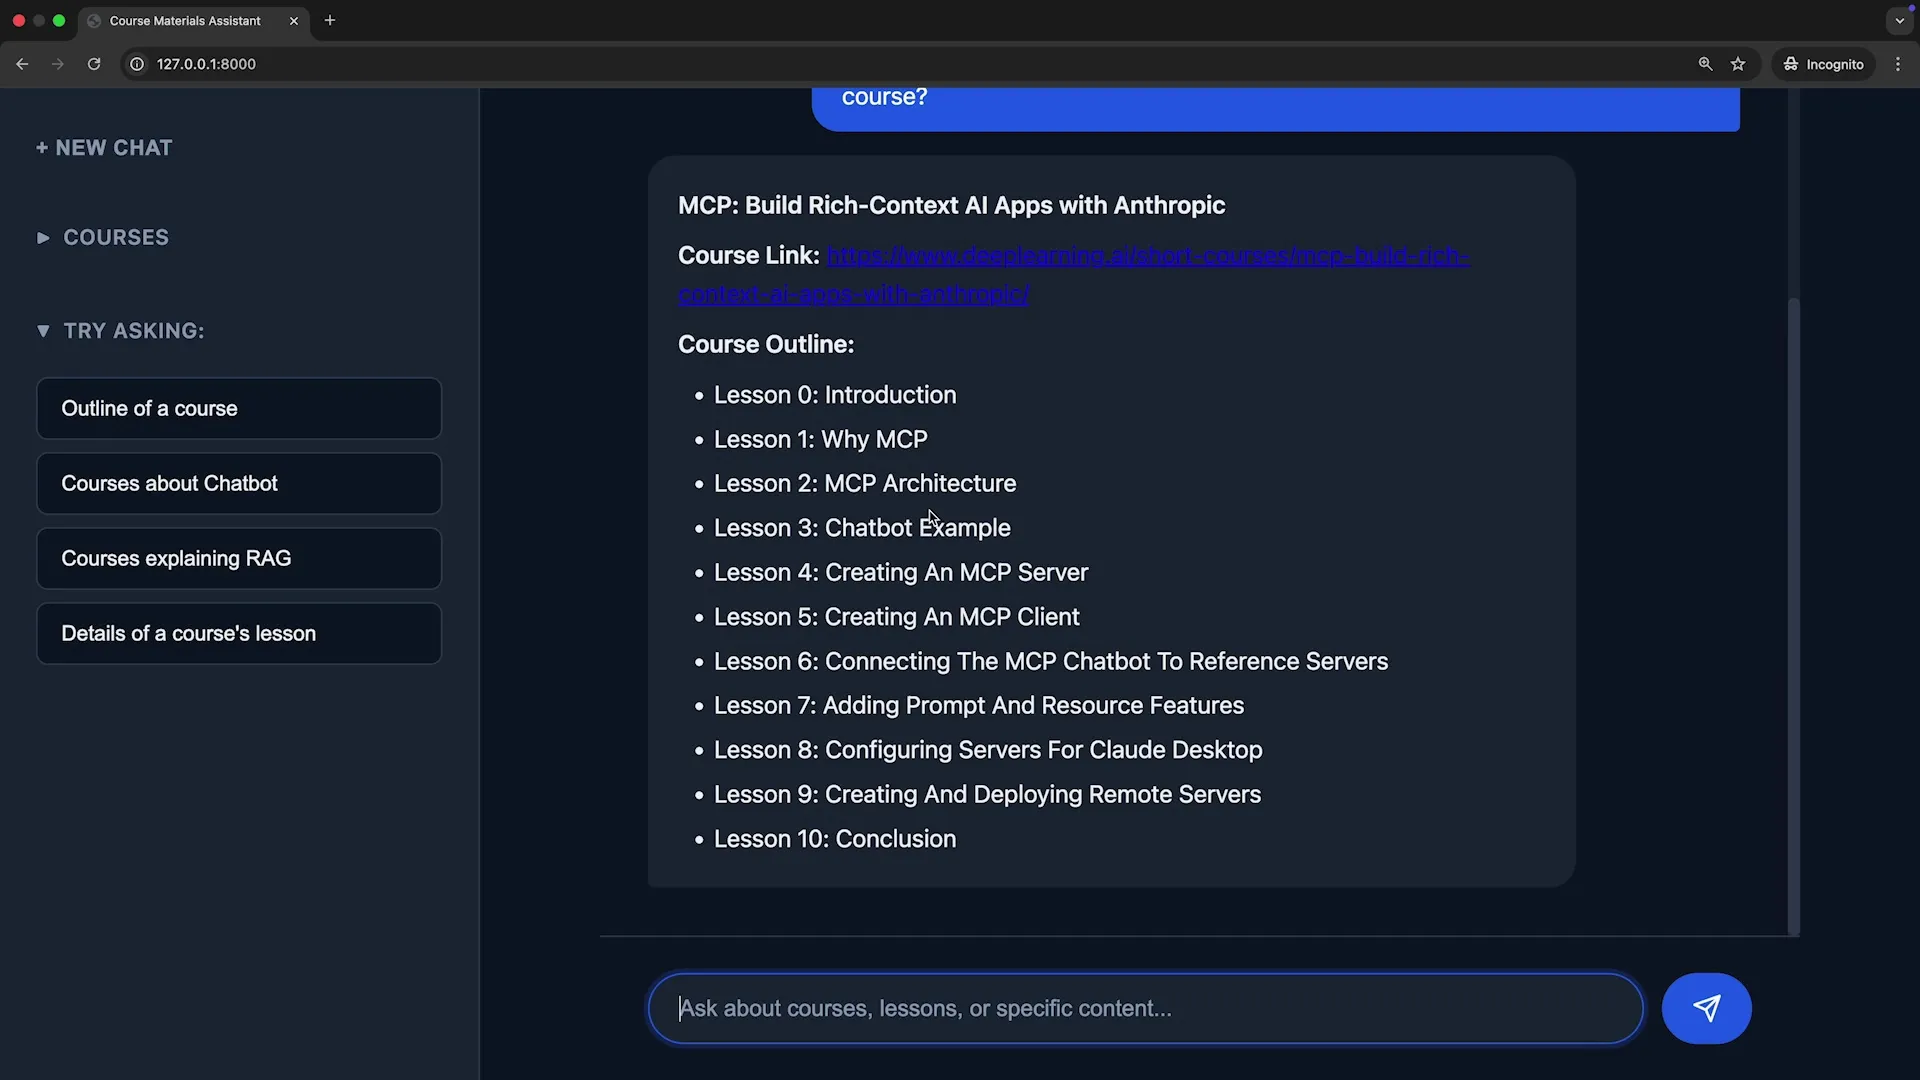
17:14 Here, we can see the names of the lessons
17:16 and if we would like, we can even build additional functionality
17:20 to get sources for each one of those.
17:22 In the next lesson, we’ll talk about what happens
17:25 when things go wrong and how we can use
17:27 Claude Code to debug, to write tests,
17:29 and make sure that we feel confident in
17:32 the software that we’re writing alongside Claude Code.
Appendix
slash command usage
手工川自研了适用于 claude code 和 gemini cli 的 meta slash command,可以基于 meta slash command 自动生成新的 slash command,并基于 claude code 思考分级机制生成了一套claude code thinking command set,由于文件过长,留言可领取。
以下是使用办法:
- 把这些文件都放在 ~/.claude/commands/ 目录下
- 在任意目录下启动 claude code,输入
/generate-command 你想生成的某个命令要解决的问题与目标,回车后即可自动生成一个你想要的命令,语法无需你刚刚提及的“i want to create a slash command, this command is to …the input is … output is …”,你甚至直接可以说“the input is … output is …”,它会做完其他全部事。完成之后,退出cc,重新启动,输入/就能找到新的生成的命令了 - 在你正在开发的项目目录下,启动cc,输入
/think或者/think-hard或者/think-harder或者/think-ultra,接你的需求,就能强迫cc展开对应深度的思考 - toml 格式的command是用于gemini cli的,本 generate-command.toml 是基于适用于 claude code 的 generate-command.md 的 gemini cli 的变体版本,你可以基于 generate-command.toml 构建属于你自己的 gemini cli commands,但四级思考模式似乎是claude code专属的,我个人暂未基于gemini实现适用于gemini的四级思考模式